Sunday 18 September 2016

The 'Jade Garden' Nail Art

Hello folks!

I hope y'all are doing fine. :)

It's been quite a long time that I wrote a post. Nevertheless am back with a super easy and beautiful nail art for all of you to try on.

NA#19


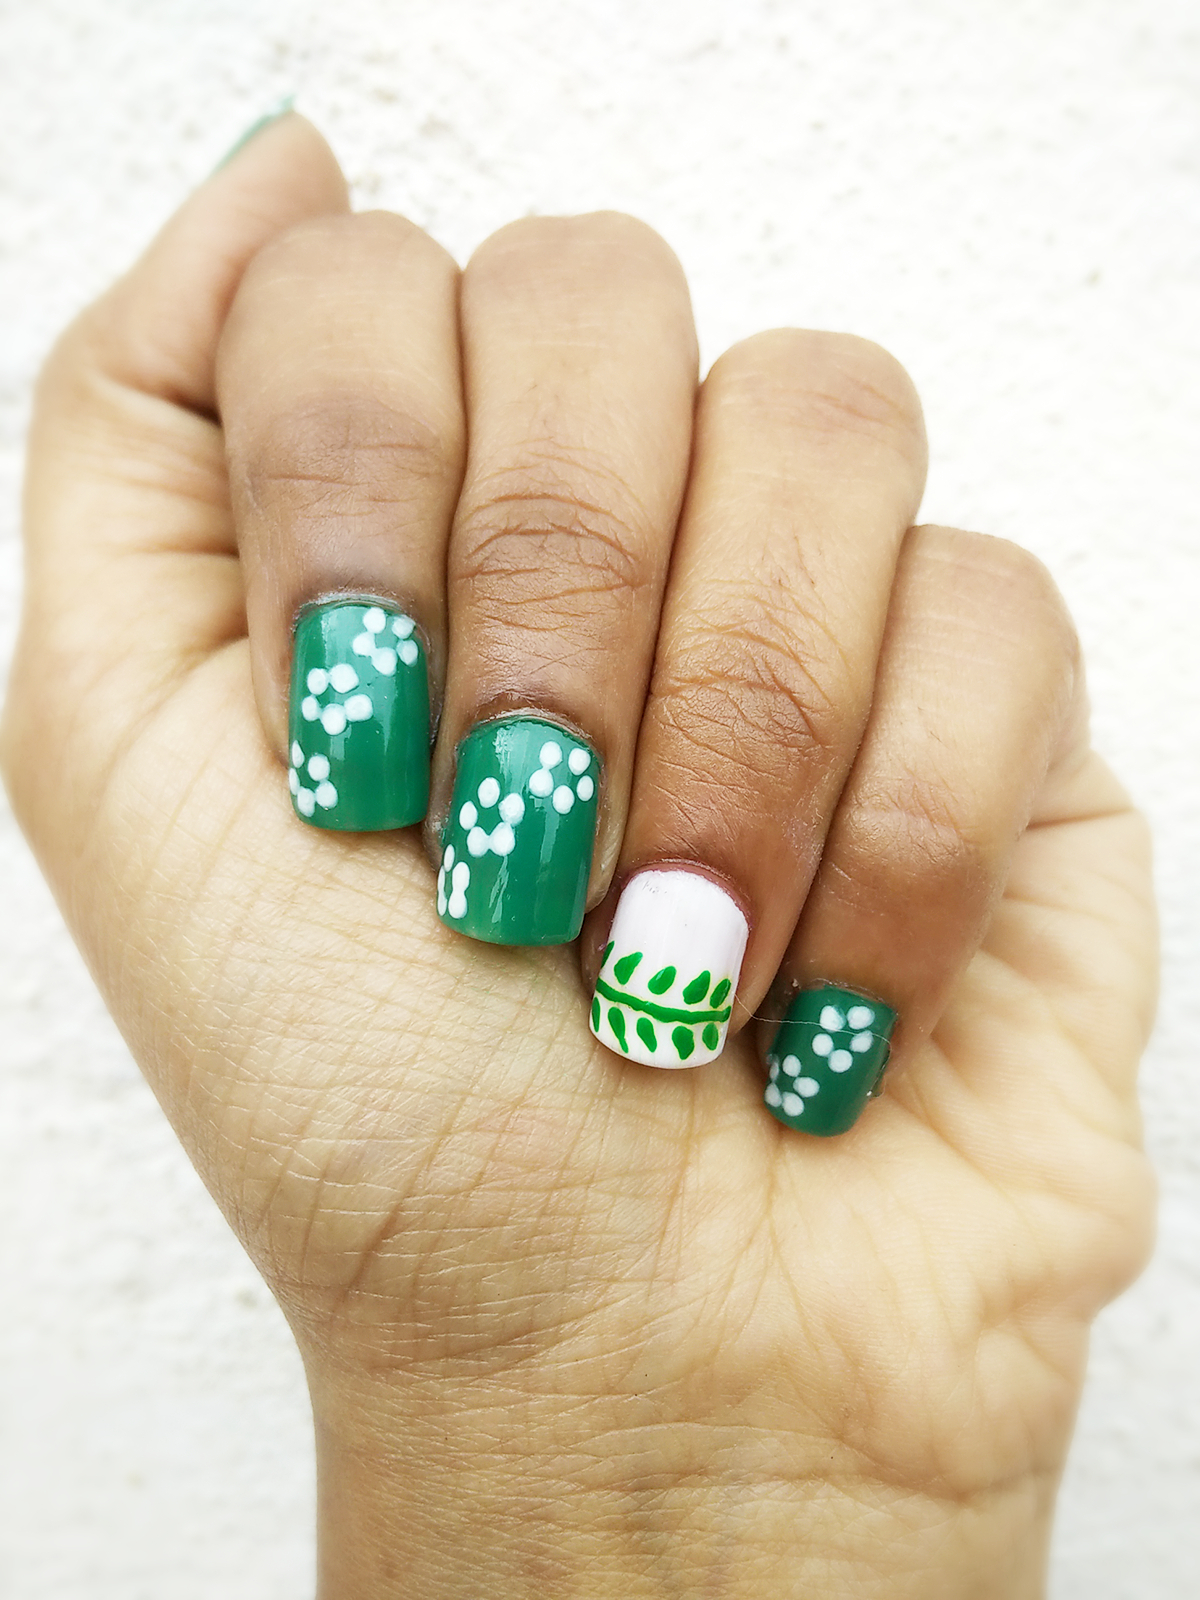
I call this design the 'Jade Garden' giving to the colors that I have used for this one. It is a very simple one to do and also looks great with different color combos.

I wanted to particularly try this out with a beautiful shade of green since it's really rare that we get to see green being generously used as a nail paint color.

So let me tell you the shades that I have used here.


If you have followed my posts then you would be well aware by now that I am a big fan of Maybelline nail paints. They really have a beautiful range of shades and quality nail paints. So even this time, the nail paints are from Maybelline range.

For the base coat, I have used two shades.

1. #301 Tenacious teal (although it's called teal, it has a warm jade green hue)
2. #102 Porcelain Party (a beautiful opaque white)

For drawing the flowers and the creeper, I have used two nail art pens from a local store. One of them being a white shade and another one being a lush jade green color.

To start of with, apply two generous coats of  green on all the nails except for the nail on the ring finger. Now onto your ring finger nail, apply two coats of white polish. Let it dry completely.

To draw the flowers

This one is pretty simple to do, since I have not used much of technique here. These are simple 5 petal'ed' white flowers.
If you don't have a nail art pen, then you can just pick a tooth pick to dot these flowers

You can start off from the top corner of your nail and just go along a diagonal line across your nail towards the tip. This pretty much makes it look like a bunch of flowers on a creeper.

To draw the creeper

Now to draw the creeper on your ring finger nail, use the green nail art pen/green polish to draw a horizontal line towards the edge of the nail leaving some space to fill up the leaves on either sides.

Now the creeper need not have that perfectly shaped leaves. Just stroke the pen to get pointed lines on either sides of the horizontal line for the leaves.

Let it dry completely.

Finally secure the design with a coat of clear polish and you are good to go! :)

Hope you enjoyed reading the post and will try this design yourself.
Have a great week ahead!

P.S: You could reuse this design for St. Patrick's Day just by replacing the flowers and creepers with clover leaves :)

Friday 25 September 2015

CupCake NailArt

Hello people!

Hope you'll are ready for a super weekend.

To add a little creativity to your weekend, here I am with a super cute nail art.


NA#18


This super cute design is a very easy one to try and will look super cute on your nails!

Let's get started then!

Colors used:6
  1. Feisty Fuschia (sober pink) #213 from Maybelline New York for half the base coat
  2. Choco Sin (hot chocolate shade) #014 from Maybelline New York for the cupcake base
  3. White shade for the cream
  4. Teal shade for the cupcake base creases
  5. Red shade for the cherry on top
  6. Blue shade for the toppings on the cream
You will also need some strips of cello tape for doing the duo-toned base coat.


First, stick on some cello tape strips to cover the bottom half of the nail, so that you can paint the pink shade on top half portion of the nail.

After the paint dries up, remove the cello tape strips carefully. Now paint the bottom half of the nail with the chocolate brown shade as shown in the picture above. Allow it to dry. This forms the cupcake base.

Now once both the colors dry and set completely, take some white nail paint using a bobby pin/ a dotting tool and try to fill the top portion above the brown shade(cupcake base) to create the cream on top of the cupcake. Allow it to dry.

Once this dries up completely, take some teal nail paint shade on a thin brush/nailart brush to draw the creases on the cupcake base so that it looks like the cupcake base paper.

Now to add the toppings on the cream, place some tiny dots using a tooth pick/dotting tool with some blue nail paint.

Now to add the cherry on the cream, place a considerably larger dot on the white cream with a bright red nail paint using a dotting tool/tooth pick.

Allow it to dry completely, secure the design with a coat of clear polish.

And you are done!

Cupcakes anyone?? :)


Wednesday 16 September 2015

Geometric Nail Art

Hello Folks!

It's been a long time that I met you guys through my posts.
But here I am with a new nail art to make up for the absence!

NA#17


Geometric Nail Art

It's extremely easy to do and looks great for the fall season with the warm orange shade!

I will tell you guys about the shades that I have used here for this design.
For the base coat, I have used a very warm orange shade from Maybelline Newyork ColorShow range of nail enamels(Yeah! you know me now! A great fan of Maybelline :P), #214 called 'Orange Fix'.

Two good coats should do for the base coat. Just the plain shade itself makes your nails look so attractive!

Now for the design, I have used a black shade.
Just pick up any good dark black shade. Also you would need few tools if your gonna use the bottle nail paint to draw the designs, like a thin brush. But I have used a nail art pen to draw the designs here.

For the index and pinky I have done a tiny traingle at one of the edges of the nail. Just swipe the nail paint brush at one of the edges of the nails diagonally to draw the traingle.

For the thumb and middle finger I have done tiny rings with the nail art pen. This one looks super cute and you could actually do this design on all the nails if you'd wish to!

For the ring finger nail, I have done a zigzag tape at the edge of the nail with the nail art pen. Just draw a thin zig zag line at the extreme edge of the nail using the nail art pen and fill up the space with the nail paint brush itself.

To secure the design, I have used a clear coat polish.

Tadaaa....your nails are super ready for this fall!


Sunday 12 July 2015

Colorful Confetti Nail Art

Heyy people!

It's a super weekend and am back with a super easy nail art.

Here it is,

NA#16


It's an extremely easy nail art, doesn't really require many tools to do it and its colorful ;)

So let's get started.

I have used 5 colors for this design. All the nail paints are from Maybelline Color show range of nail enamels. (I just so love these! Seems like I have become the unofficial brand ambassador of Maybelline Newyork :D)


The shades that I have used are (from left to right in the picture)
  1. #213 Fiesty Fuschia (as the base coat)
  2. #405 Sweet Sunshine (yellow)
  3. #404 Mint Mojito (minty green)
  4. #401 Constant Candy (candy pink)
  5. #303 Shocking Seas (bright blue)
First paint your nails with the base coat. I have used Fiesty Fuschia, a very sober magenta shade from Maybelline as my base coat. You could even experiment with other colors since this design is just a burst of many colors. Just make sure that the base coat you choose compliments well with the other shades you choose for the confetti dots.

So once the base coat is dry, start dotting from the tip of the nails towards the cuticle.
I have used a dotting tool here, but you could even use a ball point pin or a toothpick.

There is no said order in which you have to use the colors to dot. Just pick the colors one after the other and dot it away. Concentrate the dots more at the tip of the nail and go on dotting till the mid length, slowly tapering the number of dots as you go up.

Make sure you don't put too many dots of just one or two colors that there won't be any space left for the other colors on the nail. Also you can overlap few dots here and there of different colors so that it looks like real confetti in the air.

Place just one or two dots toward the cuticle. This gives the look of the confetti just rising in the air.

Once the dots dry out, seal the design with a coat of clear polish.

That's it for today!

Have a great weekend!
XOXO :)


Monday 6 July 2015

Peacock Feather Nail Art

Hello Folks!

I am back with a new nail art design.

I was just browsing through the web when I came across a beautiful picture of a peacock feather and it hit me that I could actually do a beautiful design inspired from it for my nails.
Also I always remember God Krishna (One of the most celebrated gods in India usually depicted with a peacock feather adorned in his crown) whenever I see peacock feathers. So to add a bit of tradition to the design, I just added a beautiful Indian pattern on the ring finger and thumb to match the peacock feather design.

So here it is,

NA#15


The design is a bit complicated since it needs a lot of colors to do the minute details. But I am here to make it simple for you guys.

Let's get started then.


I have used a beautiful blue color from the Maybelline Color Show range of nail enamels for the base coat. It's shade #303 called 'Shocking Seas'.

Next to do the pattern on the ring finger and thumb, I have used a beautiful design from stamping plate number 'm93' from Konad. (To know how to use a stamping kit, refer to my first post in the blog) I have chosen the leaf like pattern to match it up with the feather.

Now this pattern has some space in between the leaf borders. I chose to fill this space up with few colors of the feather.

To fill up the space first I have taken a sparkly muddy shade from Maybelline Color Show, #501 called 'Silk Stockings'. Since filling this up cannot be done with the polish brush, I have used the nail art brushes to do it. You guys could also use a toothpick or a thin paint brush to do the same.

You have to let this dry completely since you are filling this space again with few more colors.

Next I have used a golden polish nail art pen to draw an inner border to the leaf pattern. This goes for all the leaves in the pattern as shown in the picture. Allow it to dry completely.

Now meanwhile this dries, make a big leaf on the middle finger nail as a base for the feather.
To make this leaf, I have used a gorgeous minty green color again from the Maybelline Color Show range, #404 called 'Mint Mojito' using a nail art brush. Allow it to dry.

Now make two smaller leaf patterns at the centre of the green leaf, one using the muddy brown colored polish 'Silk Stockings' and upon that a smaller leaf with the golden polish nail art pen. This will give the peacock feather look. 
Make sure the polish is dry before adding another color else it will mess up the design.

Allow this to dry and revert to finish the patterns on the ring finger and thumb.
To give the feather look to the patterns, I have added a small dot of purple polish from a purple nail art pen at the centre of each leaf pattern in the stamped design.

Now for the peacock feather on the middle finger nail to look a little evident, I have drawn a freehand feather design on the overlapped colors using a black nail art pen just roughly outlining the colors. I have drawn it in a messy way so that it looks like a print. This has to dry completely.

Now to finish the design, add a bigger dot of purple polish at the centre of the feather.

Once the design is dry, secure it with a top coat.

Voila!

Friday 5 June 2015

Fish Scale Turtle Nails

Hello people!

Hope you guys are doing fine.

I am back with a pretty nail art once again! Here it is.

NA#14

I agree that it looks pretty weird here, however it looks better in real than in the picture.

So let me tell you what polishes you need to get this design.


I was inspired by my mom's new pet for this design. No its not a fish, mum bought a turtle :D
Also I bought this whole new range of nail splatters from Maybelline NewYork Color Show nail enamels (Am a big fan of Maybelline!!!) that I thought I should use.

So the polishes I've used here are both from Maybelline, the shades being
  1. Fantasea green- a very pretty lichen green color as base coat for the design
  2. Unmellow Yellow(from Maybelline 'Go Graffitti' range)- a very pretty graffitti nail paint with black and green hexes and splatter in a clear base.
  3. A white nail art pen to draw the fish scales.
SO let's get started.


The design is pretty easy to do, but once it's done it looks complicated. So to make it easier, I've shown the steps in the picture above.

So first paint your nails with the shade Fantasea green(a good two coats) and let it dry. This color gives the design the turtle color. Now once the base coat is dry, start off with the fish scales.

To do the fish scales you would require a nail art pen. A tooth pick or even a nail art brush would do, but the nail art pen gives a good precisioned design, making it look more like a stamp or sticker design.

I have used the white nail paint for the scales since that would look bright on the dull colored base coat. Draw the scales on your nails as you normally draw with a pencil on paper. Start off from the tip of the nails.

Let the design dry completely. 

Now apply a coat of the splatter nail paint 'Unmello Yellow' just to give it the glittery look. You can skip this if you wish to keep it simple and just apply a top coat to finish the look.

Hope you guys like the design!

Have a great weekend ahead.


Thursday 14 May 2015

The Spring Orchid Nails

Hello folks!

Hope y'all are doing fine.

I have been wanting to share this nail art design from a very long time, and finally I got the chance to do it today.

I usually write posts on weekends, however I wasn't able to maintain that routine since last few weeks and thought that I should make it up for it with this post.

SO here is my new spring nail art!

NA#13


This is by far one of my most favorite looks! Its absolutely pretty and can match up with almost any attire!

I have used four colors for this look. Two shades of purple for the flowers, white polish for the base coat, a teal colored nail art pen for the leaves and branches and a top coat to secure the design.


The white shade and the top coat are from Maybelline New York Color Show range, the purple shades are from a local brand(just liked the shades so picked it up :P).


So lets get started with the design.

First paint your nails with the white polish as the base coat. This will serve as the canvas on which you will draw the flowers.

Once that is dry take some light purple polish with your dotting tool(or a ball point pin if you don't have one) and start dotting the flower petals. I have done a 5 petal flower here, but you can even choose to differ on the number of petals.


I have used the ball point pin as the dotting tool just to show you guys that, if dotted neatly, it would give the same clean design that you would get if done with a dotting tool.

Now let the flower petals dry, after that pick some dark purple polish and dot that over these light colored petals leaving some portion visible to add some depth. Let this dry too.

Now add a dot of white polish at the centre of the flowers to complete the flowers.

Now to do the leaves and branches, use the teal colored nail art pen. Use the brush that comes along with the two-way nail art pen and carefully connect the flowers. If you do not have a nail art pen then use the sharp end of a toothpick for drawing the branches. You do not need to connect all the flowers, as that would look crowded.

Once it is dry completely, secure the design with a coat of clear polish.